As a mother, and now a grandmother, family and home are very important to me. Some of my favorites memories are of being in the kitchen and cooking with my own mom. Having a good meal over the dinner table with family is priceless! But, making it happen is hard work. I wanted to share with you some of my secrets, tasty dishes, and cooking wisdom. So, that your dinner table will become a gathering place for your own family that they too will come to cherish.....Yours truly, Mystery Mom.

Wednesday, July 4, 2012

Mom's Berry Cobbler

We have had an overflow of berries from our various plants in our garden.  First the Raspberries, now the Blackberries, and so to come will be the Blueberries, all very welcome Summer treats.  So there is no better way to eat these  wonderful treats than in a nice berry cobbler.  You can use the basics for this recipe to create any fruit cobbler.  I did this because we current have two gallons of blackberries needing to be used in some creations.


Mom's Blackberry Cobbler

6 Cups of Blackberries
1 Cup Sugar
1 heaping Tbs. Cornstarch
1 dash of Cinnamon
1 tsp. Baking powder
1/2 tsp. Almond Extract
1 Cup of Flour
1 Cup Sugar
1 Cup Melted Butter
                                                                                   2 Eggs


     Take the berries, 1 cup Sugar, cornstarch, and cinnamon and mix together in a pot on the stove on a medium heat.  You will need to stir the mixture until it is thick an bubbly.


     For the topping, you will need to take the baking powder,almond extract,flour,sugar, and eggs and mix together in a large mixing bowl.  

     Once the berry mix is bubbly and thick you will want to pour it into a greased 9 X 13 inch baking pan.

Now take the topping mixture that you have made and you will want to random teaspoon filled clumps of the mixture all over the top of the smoothed out berry mixture that you have already placed in the pan.

Once finished, you will place the dish into an oven that has been preheated to 375.  You will bake the cobbler for about 40 minutes.  Keep an eye on it if your oven is slightly off for some reason.  You want the topping to be only slightly brown with a tinge of crust.  The topping needs to not be overly baked and be too hard or crunchy.

Fresh Homemade Lemonade

   Who doesn't like a nice glass of cool fresh lemonade on a hot Summer's day ?  Or, try blending  the lemonade with ice into a nice fresh, tangy smoothie.

Fresh Homemade Lemonade
Several Lemons
2 Cups of Sugar
1 Cup of Water
2 Cups of Lemon Juice
1 gallon of Water


Take some lemons and squeeze the juice out of them.

Take the 2 cups of sugar, 1 cup of water, pour them into a small sauce pan and heat on low.  Stir occasionally  until all the sugar is dissolved.


Take the simple syrup and pour it into a jar containing 1 gallon of water.  Then add the 2 cups of freshly squeezed lemon juice.  Stir.  Garnish with sliced lemons, and chill.

Saturday, June 2, 2012

Marinated Tomato Cucumber Salad

   This nifty little salad has a tangy and zesty kick to it.  It's fresh, easy to make, and is great for BBQ's, picnics, or just when you need a little something different in a salad.

Marinated Tomato Cucumber Salad
4 Regular sized Cucumbers
1 package of small grape Tomatoes
1/2 Red Onion
1 teaspoon Dill
1 cup of shredded Parmsean Cheese
1 bottle of Gerard's Italian Salad Dressing

     Take the 4 cucumbers, peel them, and slice them in half.  Seed them.  Then cut them into 1/4 inch chunks.

     Take the package of small grape tomatoes, cut them in half, and seed the also.

     Take your 1/2 Red Onion and quarter it, and then slice it as thin as you can.


     Now, mix the cucumbers, tomatoes, red onion, dill, shredded cheese all into a large mixing bowl.  Pour in one bottle of Gerard's Italian Salad Dressing, an mix.  Then either transfer to a covered container, or cover the mixing bowl with Saran wrap, and allow the salad to sit in the refrigerator overnight.

     The salad tastes best the longer that you allow it to marinate.  It will be good in a couple of hours, but I find that it really has to set overnight, and will last for a few days after that.  Before you are ready to  serve it, you will need to drain the bowl of the excess dressing.  I usually leave only about 1/4 of the juice in the bowl.  It is meant to be served that way.

Thursday, May 10, 2012

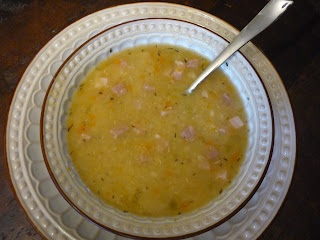
Homestyle Country Ham and Bean Soup

     Whether you want something warm and filling during the winter, or just a bit of good old fashioned comfort food during the summer; this Homestyle Country Ham and Bean Soup hits the spot everytime!  And it always tastes great with a nicely grilled cheese sandwich.

Country Ham and Bean Soup
12 Cups of Chicken Broth
2 large Ham Hocks
1 Large Diced Onion
3 Celery Stalks
1 Cup Shredded Carrots
1/2 tsp. Pepper
1/2 tsp. Thyme
1 Package White Beans
1 tsp Baking Soda
1 Ham Steak Diced


     As part of the prep. for the meal, you will have to take one package of White beans and put them in a bowl . Then add one tsp. of Baking Soda, and fill with with just enough water to cover the beans.  Cover the bowl, and let sit on the counter overnight.  In the morning pour water off beans and slightly rinse.

Score ham hocks, and place in pot.  Pour in 12 cups of good chicken stock.  Add beans, carrots celery, onion and seasonings .  Stir together cook on med heat till boiling. Once boiling reduce heat to low and simmer for about 3 hours, keep lid on pot.


Next, you will remove the Ham Hocks and you are going to mash the beans, and then recover.  Take the Ham Steak and dice it up, and add it into the mix.  You will want to let the soup cook for another 15 to 20 minutes before serving.  Add salt to taste, you may not need salt depending on how the ham was cured.  IF as it happens at times the ham was cured a little too salty, then add water to the soup to dilute the overtly salty taste.


Sunday, April 29, 2012

Oatmeal Cake

     It always seems  to be a good dessert, when you can add the phrase, " this was my Great Grandmother's recipe".  Well, this Oatmeal Cake  is made from my Great  Grandmother's recipe !   I have found that nobody turns down this caramel-oatmeal-coconut treasure.  It won't last long as left overs  on a platter, so get your piece quickly !  It also tastes great with a scoop of vanilla ice cream on the side or on top served warm.


Oatmeal Cake

1 1/4 Cup boiling water
1 Cup minute Oats
1/2 Cup  Butter
1 Cup Sugar
1 Cup Brown Sugar
 1 Tsp.  Pure Vanilla Extract
2 Eggs
1 1/2 Cup Flour
1 Tsp.  Baking Soda
1/2 Tsp. Salt
1/4 Tsp. Nutmeg
3/4 Tsp. Cinnamon

     Pour the water over the oats, and let sit for about 20 minutes.

     Now this recipe calls for fresh nutmeg.  So I will show you how to get that special ingredient

     Mix together the butter, sugar, brown sugar, vanilla, eggs,

     Now, you are going to mix in the dry ingredients.  Add the flour, baking soda, salt, nutmeg, and cinnamon together into the bowl and mix.  It will become dry in consistency, unlike normal cake batter.
     Next, you will add the oatmeal.  You will see as they mix together, that the spreadable cake batter consistency returns.  So that you will be able to put it into a 13 X 9 inch greased pan.  Bake the cake at 350 degrees, for 30 to 40 minutes.

     Now while the cake is baking we will prepare the topping,
Oatmeal Cake Topping
1/2 Cup Butter
1 Cup Brown Sugar
6 Tablespoons Milk
2/3 Cup Chopped Pecans
1 1/2 Cup Shredded Coconut
     
  Now, in a saucepan over medium heat, combine the above ingredients.  Stirring the mixture until the sugar melts.
     
When the cake is done. Pour the topping mixture over the cake and spread it out.  Then, place the pan in your broiler  until the frosting slightly begins to bubble, then remove and let cool.

Saturday, April 21, 2012

Macaroni Salad with Shrimp

     Yes, summer is just around the corner, and just thinking about summertime foods gives you a craving for a Macaroni salad.  Whether it's picnics, potlucks, BBQ's, or a cool addition to a hot summer evening meal; a Macaroni salad that tastes other than just mayonnaise is always a welcome treat!


Macaroni Salad with Shrimp
16 oz. box of pasta shells
8oz. can of good quality peas
(save 1/8 cup of the reserve juice from peas)
1 small can of black olives
20 medium sized shrimp cooked
2 Plum Tomatoes
1 green Bell Pepper
1/2 Red Onion
1 1/2 Cup of Mayonnaise
1 Package of Dry Italian Seasoning Mix
1/2 Teaspoon of Black pepper
1/2 Teaspoon of Dill

     Now as part of the preparation you will need to do the following:
          Cook the Shrimp, and when done cut them in 1/2, then set aside to cool.
          Boil the Macaroni, rinse them thoroughly afterwards to get off all the excess starch,
               then set them aside to cool a bit.
          Open the can of peas, drain the peas, but save 1/8 of a cup of the reserve juice.
          Seed, and dice the 2 Tomatoes
          Seed, and dice  the Bell Pepper.
          Drain the small can of Olives.
          Cut, and dice up the 1/2 Red Onion.
     Now, you are ready to create your masterpiece.
     
In a large measuring cup, mix the dry Italian seasoning mix, the pepper ,dill and mayonnaise together.  You can put it in the refrigerator briefly when you are done to add a chill to it.  But it is not vital to the recipe.

Then, in a large bowl you are going to dump in the Macaroni, Bell Pepper, Tomatoes, Olives, Onion,  Peas, and the 1/8 cup of reserve juice.

Now, take the mayonnaise mixture out of the refrigerator and pour it into the bowl.  Add in the Shrimp,  Then stir until all the ingredients are thoroughly covered in the mixture.  Once it is to your liking,  pour it into a Tupperware container or glass bowl and tightly cover.  The salad is best  if it is allowed to refrigerate and set over night.
     

Monday, April 16, 2012

Muffeletta Sandwich

     This is a new classic for our family.  Invaritably, when my kids invite over guests for dinner one of their first requests is, "Mom, can you make that sandwich?". What they mean is can you make the Muffeletta.  I do bend to their requests once in a while because as you will come to  see it is one on the most amazing sandwiches that you will ever taste.  But, it does require a little extra shopping, time to assemble, and preferably has to sit overnight to get it's full taste potential.  So, knowing spontaneous nature of kids, and their requests, that doesn't quite work for a quick dinner meal.
   But, with not too much effort, you will find that the Muffeletta works great not just a filling dinner, but also a special meal during a picnic hike, small lunch gathering, or cut to size for a dinner platter.  I must also add that it makes a wonderful treat in a brown bag lunch the next day.   Hopefully, at this point I haven't scared you off form the challenge.  Because, I can assure you the effort is well worth the taste.

Muffeletta Sandwich
1/4 Cup of Wine Vinegar
2 garlic cloves  minced
1Teaspoon of Oregano
1/3 Cup of Olive Oil
10 large pitted green olives
1/3 Cup of Kalamata Olives
1/4 Cup of roasted red peppers
1 pound  round bread load
4 oz. of ham
4 oz. of Mortadella
4oz. of Salami
4oz. of Provolone
1/2 red onion, sliced very thin
1 1/2 oz. of Arugula leaves

     First of all,  you will want to make sure that you get good fresh ingredients for this sandwich, especially for your meats and cheeseThe taste will suffer if you try to use just average sandwich meats.  That is why I said at the beginning it takes a special trip to the store and deli section.

     So, to get started.  First, whisk together in a bowl the red wine, minced, garlic, and oregano.  Then, gradually blend in the oil.  You are going to whisk and blend until you get the consistancy of  salad dressing.

  Now, stir in the olives, and peppers.  Season the mixture to taste with salt and pepper.

 Take the round loaf of bread, and with a good bread knife you are going to cut off the top 1 inch of the loaf.  Take that top and set it aside.  Then, with your fingers you are going to hollow out the bottom half of the loaf, to create a bread bowl.  After that,  you will slightly hollow out the top that you had set aside.

  Now, spread some of the dressing mixture over the inside to the bread bowl, and the top lid.

  Next, you will layer the meats and cheese lining the inside of  the bottom half of the loaf.  Keep the pattern consistant  layer upon  layer.  

  Once the bowl is full, top it all off with the onions, and arugula lettuce.  You will  then spread any of the remaining dressing over the sandwich.

  Put the top back on the loaf, and wrap the whole thing tightly in Saran wrap.  Refrigerate it over night for the best results, even though after just a few hours the sandwich will be good enough to eat, if you are in a pinch for time..  When serving it up, cut into wedge slices.  Be reminded that this is a very filling sandwich so don't over do it on the wedge size.  Enjoy!